Showing posts with label Lovely. Show all posts

2012 Mini Album Tutorial

>> Wednesday, January 4, 2012


Happy New Year everyone.  It's Ronda today with a step by step detailing this adorable mini album for the new year.  This quick & easy mini could be used for multiple projects such as a goal journal, a One Little Word album, a monthly glance at your year, etc.  So many possibilities in one sweet little album. 

Supplies:
a variety of Lily Bee patterned papers
Lily Bee Alphabets
Lily Bee Happily Lost Stamps
two 4 x 6 Chipboard pieces
scoring tool
Paint
Binder Rings
Border Punch
hole punch
Sewing Machine


First you need to cut two pieces of 4 x 6 inch chipboard pieces to create your cover.  You can usually purchase these pieces fairly cheaply from your local scrapbook stores.  I usually have a stack on hand so i can create my own covers.


Choose your favorite Lily Bee Patterned paper for the cover.  Here i am using This & That Milk Bottle.  I just love that blue!  Adhere to the front of the chipboard, gluing in the center of the paper.  Why you ask?  Well i knew i wanted to stitch around the edges of the chipboard so i didn't want my needle hitting the adhesive & getting sticky. 


I added a thin paint layer around the edges of the album to give it some texture.  I love that it is quick & a bit rough.  Next i stitched around the edges of the cover.  Yes you can stitch through chipboard.  Just go nice & slow, using a long stitch making sure your tension isn't too tight.


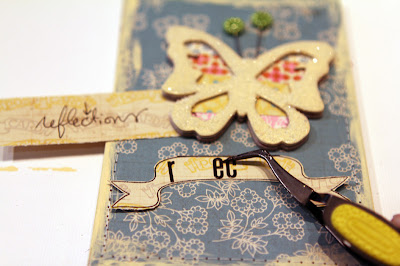
Next i added a chipboard accent piece.  I painted the top of the butterfly using the same paint i used around the album cover.  Next i added a bit of clear glue & some German glass glitter.  You could also use regular glitter as well. 


Once i added the butterfly to the album i decided the solid orange background wasn't popping enough for me so i changed it up with strips of leftover patterned papers.  I added two green stick pins for the antennae which added that pop of color i needed.

I grabbed my Happily Lost Banner Stamp and stamped it on a piece of neutral patterned paper.  I went with the same color palette as the paint.  This way my title could really stand out.


This album is titled Reflections.  In order to get the position right on the banner, i first wrote out my word and found the center letter.  I work out from there to fill in the rest of the letters.  Sometimes i add the first letter so i know how much room i have.  You also have to remember you may have to adjust your "center" letter depending on the font size of the letters.


Next choose a variety of coordinating Lily Bee Papers.  I have a fun bright palette of colors choosing warm greens, yellows, pinks, oranges, blues, and a hint of black.  They make me happy!  You will need twelve 4 x 12 sheets of patterned paper plus one 4 x 6 piece.  These are going to be the base of your interior pages.


These 4 x 12 pages become pocket pages similar to the So Blessed Lily bee album i did in 2010.  Score your twelve 4 x 12 pages at 2 inches and at 6 inches.  Fold the page in half at the 6 inch score mark.  Fold the 2 inch score mark down & punch the edge with your favorite border punch. 


You can adhere the two sides down and create the pocket.  I like to stitch mine down by stitching all around the edges of the page.  Now you have 12 pockets for your mini album, one for each month if you so choose.   

I have created these journal inserts for my pocket pages.  You can download the pdf of the interior pocket journal cards from my blog.  I am planning on using this to capture my month's at a glance.  I will place a photo on one side of the page & the pocket page on the other side. 

Because of the way i am doing my photos, i needed a cover page.  Here i have two options for the interior cover for you.  One uses the the journal card on the cover page to create consistency.  The other makes use of the scraps of patterned paper.  I gave you this option because you would need to print out an extra journal card to use it on the cover. 


Here's the start of my interior pages. I plan on placing a collage of photos on the backside of the green paper, opposite of the January pocket that is a snapshot of my month.  Like i said above, you can use this album for multiple projects.  

Have a blessed New Year

Read more...

Keep it Simple.

>> Tuesday, November 22, 2011

If you are anything like me, you might be slightly freaking out that Thanksgiving is this week. Which means Christmas is soon to follow.

We are still trying to get through our Halloween candy! :)

Trying to make time or keep up with crafting and scrapbooking during the holidays can be a little tricky with all there is to accomplish! Let me share with you my secret: keep it simple.

My husband and I celebrated our ninth wedding anniversary last week-- it's obviously something I wanted to document. I usually spend quite a bit of time on my layouts, but with last week's schedule that wasn't an option-- so I challenged myself to keep it simple.

I used one photo and layered a variety of papers from the Head Over Heels collection (love!). I even used the (short) journaling and title from a recent blog post. Easy!

So the key is to keep it simple. And when you do, you will be amazed at how much you will get done even during this busy season!!

Lily Bee Supplies Used:
Head Over Heels: Smitten, Courting, Swoon, Crush, Dreamy, ABC Stickers
Lovely: Chipboard Stickers

Read more...

Happy Monday everyone!

>> Monday, September 12, 2011

Hope you all had a lovely weekend which included at least a little bit of crafting time!


My latest Lily Bee project is about the pet names I call my children. Nick-names are usually shorter than the original but for some reason I have lengthened each of my kids' names lol... Lucy, Eliza and Archie become Lucy-lou-lou, Liza May and Archie boy...


I bought some new dies last week and couldn't resist playing with them, layering different papers to make the one flower was a lot of fun and I love the result. We're just coming into spring here in Australia and these papers matched the fresh, sunny weather perfectly...


products used:
Lovely paper - Whimsy (the green background, isn't it fun?)
Hello Sunshine paper - Twirl, Savannah and Picnic
Hello Sunshine chipboard stickers
Hello Sunshine die cut frames
Picket Fence - ABC stickers

Have a great week everyone!


Read more...

Using up your stash: from start to finish.

>> Thursday, July 28, 2011

Today I want to share with you a layout created with Lily Bee's new collection, Head Over Heels.

One of my favorite papers from this collection is the blue doily/chevron paper, "Dreamy". I used a portion of this paper for a CHA booth layout (hence why you see doilies cut out of the paper below), however, I was determined to use every inch of this paper because it's just gorgeous!

I know many of us are wanting to use up our stash of paper (or scraps!) to make room for all the new lines that will be available soon. So today, I wanted to show you how I used a "pre-used" piece of pattern paper to make a layout.
First, I layered the "Dreamy" pattern paper on top of "Flirt"- a gorgeous pink damask pattern paper in the Head Over Heels Collection. It created a wonderful contrast and really brought out the doily pattern.

Next, I added a kraft envelope, and layered the text chipboard stickers in the Lovely collection over the doily cut outs. I was really excited to see that the shapes fit perfectly together!

I added a few cardstock stickers from the Head over Heels collection down the side of my layout. I used the ABC stickers to change the "Be Mine" sticker to say "She's Mine" in order to fit my topic.
Finally, I finished the layout with my title and handcut flowers from the pattern paper Swoon (which is appropriately named if you ask me!).

I hope this layout inspires you to be creative with some of the pieces in your stash that have been pre-used!

Lily Bee Supplies used:

Head Over Heels- Dreamy, Swoon, Flirt, Smitten, and Mixed Cardstock Stickers.
Lovely- Chipboard Stickers
Happily Lost- ABC Stickers

Read more...

Contrast

>> Wednesday, June 29, 2011

Lately I have enjoyed approaching layouts with the focus of "contrast" as I brainstorm my layout topic, journaling, and the overall design.

incrediblejoy 001 copy

Lily Bee Products used
Picket Fence: Cottage Garden, ABC Alphas
Three Little Birds: Just Relax, Die cut frames, Accent Rub Ons

Lovely: Charm, Chipboard Stickers

So often I document the who, what, when, where, and why-- these are some of my favorite pages and memories. But I love to challenge myself and think deeper in terms of topics and journaling.

incrediblejoy 016 copy

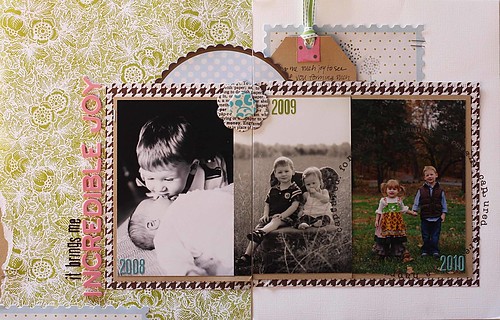
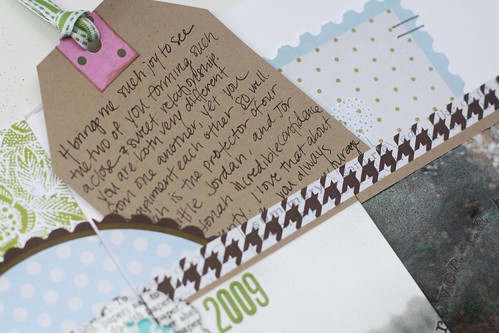
For instance, this page above does not really have a who, what, when, where, "story"; however the story I am telling has to do with my children and their relationships as siblings. I use contrast by showing and comparing visual differences of each year's photos (it's crazy how much they change in a few short years!). I also used "contrast" as a journaling prompt to share how although very different, their strengths bring out the best in one another.

incrediblejoy 020 copy

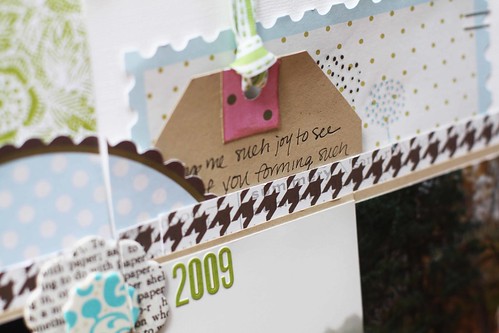
As I was designing this layout, I decided to keep it simple and continue with the theme of contrast. I used one white cardstock page and one pattern paper page and connected the photos across the layout. By using two black and white photos, and one color photo, there was visual contrast and the most recent photo is highlighted in color.

incrediblejoy 021 copy

The wonderful thing about Lily Bee is that so many collections bring out the best in one another! I used three different collections in this layout (Picket Fence, Three Little Birds, and Lovely).

I hope this inspires you to think outside the box next time you sit down to create a layout. Look for ways to contrast photos and design-- and of course don't forget to reach for Lily Bee!

Read more...

She loves School

>> Friday, April 22, 2011

Hi everyone, this is my first blog post here and I couldn't be more excited!
For today's Layout I have chosen a page about my daughter's love of school. She can't wait to get out the door in the mornings and I have tried to capture this excitement of a school morning on my page.
I have painted some of the background with a light coat of Gesso to make the randomly applied rub-ons stand out a little better. The title was cut with my Silhouette. As you will get to know me a little better over the next few months here on the Lily Bee blog you will notice that most of my projects have at least one little bit of yellow color on them. I love how it brightens things up instantly...it's such a happy color!


Lily Bee Supplies:
Lovely - Bonjour paper
Lovely - Rub-ons
Hello Sunshine - Fly a Kite paper
Hello Sunshine - Die-Cut Frames
Hello Sunshine - Rub-ons
Hello Sunshine - Chipboard Stickers

I would like to wish all our blog readers a very Happy Easter!!

Read more...

Happy St. Patty's Day...

>> Thursday, March 17, 2011

Happy St. Patty's Day! I just love all the fun green, clovers, leprechauns and fun of today! Today is one of my favorite "no pressure" holidays! It doesn't hurt that green is one of my favorite colors.

I made these cute little cards to celebrate!


I used a mixture of the Lovely Collection and Christmas Town. I know it's been said over and over, but all the collection really do work well together, don't you think? That's why I love Lily Bee so much!


I also used the backing of the big sheets of rub-ons for my card base and the "Lucky to know you" tag. Again, I love love love Lily Bee!! Even the packaging is perfect!


Lily Bee Supplies Used:
Lovely Collection Patterned Paper - Whimsy
Lovely Collection Chipboard Stickers
Christmas Town Patterned Paper - Sleigh Ride
Christmas Town Patterned Paper - Christmas Window
Christmas Town Chipboard Stickers


Read more...

Lily Bee Challenge: Paper Embellishments

>> Wednesday, March 9, 2011

Happy Wednesday Lily Bee FANS :)

I'm super excited to bring on the next challenge. Are you ready? The challenge is to make Paper Embellishments & you must use at least one Lily Bee Design product. Pretty simple & FUN!

For this challenge, I used the Lovely collection to create pinwheels embellishments. I used three different size squares, 3x3, 3.5x3.5 & 3.75x3.75. Drew a line from one corner to corner and cut slits through all four corners, about 1/4 inch from center of square & folded every other corner into the center. Then, I embellished the centers with Lily Bee chipboard flowers & a Maya Road ribbon flower.


The idea for the pinwheels came from the little sand spinner in the photo...love the movement.

Lovely: Charm
Lovely: Splendid
Lovely: Whimsy
Lovely: Chipboard Stickers
Lovely 12x12 Rub-ons


To participate in the challenge, please use at least one Lily Bee product (any collection). Post your layout on Lily Bee's Facebook fan page & make sure to title your post Lily Bee Challenge: Paper Embellishments or you can include a link where your layout appears (gallery/blog) in the comment section of this post.

We will choose one lucky winner by random next Wednesday, March 16th, by 9pm EST. The winner will receive the ENTIRE Lovely collection! Good luck to everyone & I can't wait to see what you create :)


Read more...

Embrace the Unexpected.

>> Tuesday, March 8, 2011

Last weekend my daughter Jordan turned three years old. A few days before her birthday, I had a marvelous idea to *try* to take a great portrait of her. I am sure you know where this is going.

She insisted on wearing this silly bucket on her head. I couldn't convince her to take it off, and I knew if I made her take it off, I wouldn't get a photo period. So I embraced the unexpected and was able to truly captured her personality in that photo. I ended up loving the photo. And the bucket? It only adds charm in my opinion.

As I sat down to create a layout to go with this photo, I (again) had something completely different in mind. I was going to create something more symmetrical and less "messy", however when I began cutting and pasting a new idea developed. I abandoned all "plans" and created as I went. Which was so much fun.

I think it's important to remind ourselves that we don't always have to have a plan when it comes to scrapbooking. Sometimes the most creative ideas come at unexpected moments.


As I was looking at the various Lily Bee collections, I couldn't help but notice how each paper has such a sweet name. Kristen did such a great job at not only designing but also name each pattern paper. I had an unexpected burst of creativity and decided to cut out a few paper names ("charm" and "whimsy" from Lovely and "twirl" Hello Sunshine Collections) to use on my layout. They perfectly describe attributes I love about my daughter.

Lily Bee Supplies Used:
This and That Pattern Papers- Brooch, Milk Bottle, Linens, Postcard, Teacup
Rub-Ons: Three Little Birds 12x12 Accent Rub-Ons


I hope this inspires you to embrace the unexpected in your creative moments!

Read more...