Showing posts with label Cindy Liebel. Show all posts

Word Personality

>> Monday, May 7, 2012

Happy Monday!

I hope you had a lovely National Scrapbook Day weekend and was able to create among your scrapbooking friends, near and far. I didn't really get the chance to do much creating, but I did brainstorm and sketch ideas I want to try. One of those ideas is to play with words using negative space throughout the background.


I used my daughters name to spell out her personalities. This is always a fun way to use up lots of space on a page and a fun way to create your title. When I've done this before, it was always with stickers. This time around, the trend is using a die-cut machine.


For this layout, I used my Cameo Silhouette to cut out the words. I used my daughters favorite colors, pink & green, to highlight each word and used a more subtle complimentary shade of color to highlight her full name separately. This required a variety of pattern papers used from five fabulous collections, which is always fun to mix old with new.
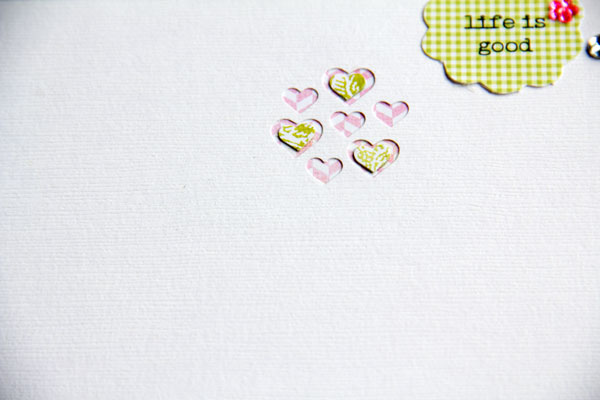

I also used a small punch to create a small accent area and embellished around it and backed it with more pattern paper and pearls.


While the words were cutting, I made time to select the papers & embellishments I wanted to use to complete the project. This allowed me to complete my layout faster and I'm very pleased with the end results. I also plan on using the leftover letters for either my project life or future scrapbook project. Can't let all those letters go to waste.

Have a great week & happy creating!


Lily Bee Supplies:
Pattern Paper:
Happily Lost-Hammock, Picket Fence-Cottage Garden, Handmade-Thimble, Handmade-Pink Lemonade, Victoria Park-Grand Theatre, Victoria Park-Wortley Village, Buttercup-Queen Bee & Statinery-Pear
Stickers:
Buttercup Mixed Cardstock Stickers
Bag of Bits:
Victoria Park & Handmade
Chipboard Stickers:
Christmas Town

Read more...

Buttercup Bracelet

>> Thursday, April 26, 2012

I spent some quality time scrapbooking and catching up with some out of town friends last month and during their visit, they shared with me a few goodies they picked up at a few local craft stores in the area. It's always fun to take a break from creating layouts to making cards or altered projects. So, I was excited when they shared with me this metal bracelet where you can add your own papers or even photos to decorate and wear.

If you are looking for a gift for the special mother in your life, then this is the perfect project for you!

Currently, my favorite colors are grey, yellow and touches of blues. I can wear it with any wardrobe and it's fun! Here is a simple tutorial to show you how easy it is to make pretty and simple jewelry using scrapbook paper.

As you can see, I used the Buttercup 6x6 Tiny Tablet papers and a border punch that had the perfect size circles to fit within the bracelet, which are approximately 1 1/4" in diameter.


Punch out a variety of prints to add to the bracelet.

Add a little adhesive to each circle inset of the bracelet and use tweezers to adhere circles.

Use diamond glaze or any adhesive that dries clear.

A sewing needle is perfect to rid of those air bubbles.

I used a lot of clear adhesive to add a little dimension to each circle. Let dry completely!

Voila! You have a perfectly simple bracelet that would make for an adorable Mother's Day gift for that special person in your life. To make more personal, consider using the ABC Cardstock Stickers to spell out name or monogram or use Clear Stamps for added texture to the simple bracelet design.
ETA: The bracelet was purchased at Hobby Lobby, but I am sure you can find one similar at Michael's or AC Moore.

Lily Bee Supples:
Buttercup: 6x6 Tiny Tablet


Read more...

Focus On: Chevrons and Zig Zags

>> Monday, April 9, 2012

Happy Monday! Surely you've noticed that chevrons and zig zags are huge right now. We are guilty of having used it quite a bit ourselves. We just can't help ourselves! So why not ask a few of our designers to create some layouts using this fun pattern?

 Layout by Cindy Liebel 

Layout by Anna-Maria Wolniak 

Layout by Melissa Mann 

It's such a classic pattern, and now, it's trendy again! Although Charlie Brown would tell you it's never been out of fashion...

Read more...

In Love With Index Cards

>> Wednesday, March 28, 2012

When there is a product that I just love so much, I hoard them as much as possible. I'm in love with the journaling cards so much. I love to use them in large quantities on layouts, too.

Thought I would use them to create the background for my layout, "& She Rides". I arranged them in a linear fashion and machine stitched around the outer edges to create a subtle border.

12 journaling cards from each collection was used, all with different design patterns and colors.

I kept the embellishments to a minimum and love how the background uses sub-duded colors so the photos pop.

Lily Bee Supplies:
Pattern Paper: Handmade/Pink Lemonade & Victoria Park/Richmond Row
Journaling Cards: Buttercup, Victoria Park, Double Dutch & Handmade

Bag of Bits: Victoria Park & Handmade

Mixed Cardstock Stickers: Handmade

Read more...

Focus On: Buttercup

>> Monday, March 12, 2012

Happy Monday, Lily Bee friends! For today, we asked some of our designers to create projects using Buttercup. This line is all teal, yellow, and grey with sweet patterns of damask, flowers, paisley, and chevrons. Can I pick a favorite? My fave is Queen Bee. Yes, I picked a favorite. I also love the stamps, it has a chevron one that's not your typical chevron. This one is filled with type. So fun! And let's not forget about the Bag Of Bits: precut patterned cardstock in varying sizes in the shapes of hearts, buttons, banners, and more! (Please click on each photo to see it larger.)


Layout by Lisa Dickinson


Layout by Cindy Liebel

Layout by Kay Rogers

We've begun shipping our products! Woohoo! It will soon be in stores near you and online. If you'd like your local scrapbook store to carry our products, please ask them to contact us! Thank you so much for being such a huge part of our success.

Since I shared my favorite patterned paper... Do you have a favorite patterned paper or products in our new lines? Do share!

Thanks for dropping by, and see you tomorrow!

Read more...

Focus On: Valentine's Day!

>> Monday, February 13, 2012

Happy Monday, everyone! Hope you had a good weekend. This week here in the US, we are celebrating Valentine's Day. It's officially tomorrow, but hey, it's perfectly okay to start early. So today, we asked three of our designers to share a layout about love and friendship.


Layout by Cindy Liebel
Lily Bee supplies:
patterned paper: Buttercup & Memorandum
cardstock stickers: Memorandum
ABC stickers: Harvest Market
other: Fiskars heart & border punch & Machine stitching

Layout by Lisa Dickinson
Lily Bee Supplies:
Victoria Park patterned papers: Richmond Row, Hyde Park, Wortley Village
Victoria Park ABC Stickers


Layout by Lisa Day
Lily Bee supplies:
Patterned Paper: Head Over Heels (Courting, Smitten, Swoon, Flirt, Crush and
Bubblegum)
ABC Stickers: Head Over Heels
Mixed Cardstock Stickers: Head Over Heals

What are your plans for this Valentine's Day? Will you scrap about it? If you do, please share with us on our Facebook page! We love to see your beautiful creations.

Read more...

Mini Butterfly Valentine's

>> Wednesday, February 8, 2012

Hey everyone, Cindy here with you today to share a how-to make cute little butterflies that dress up mini lollipops for your child's classmates. Several months ago, my little girl & I spent some time on Pinterest (I know, I can't get enough of that place) & we found these cute Butterfly Valentine project. Later that day, she created a few of her own. So of course, I got to thinking about her Valentine treats & decided to make a smaller version.


Punch a large 3/16" hole at bottom of die-cut hearts.


Match holes together while creating a butterfly form & adhere together.


Once dry, carefully slip mini lollipop through dual hearts.


Use tiny glue dots to adhere stick to butterfly, pressing firmly.

Use glue dots to adhere banner names in front & adorn with small googly eyes.


Here I punched out smaller hearts with a "Love Corinne" note on the back of them.


Pretty simple! You could even dress them up with twine or gems for fun or even buttons. But since these will be going to a bunch of 4 & 5 year olds, I though it would be best to keep it simple for their little hands. The best part is that I started these super early instead of waiting until the night before.

Smooches!

Read more...

Last day - CHA

>> Wednesday, February 1, 2012

We've had such a great show! Thank you for coming by our booth to say hi, to order, to look around. Thank you for coming by our blog to support us!

Today, we have Handmade projects!

Layout by Georgia Keays

Layout by  Cindy Liebel

 Tag holder by Lisa Day

Card by Lisa Day


Banner by Ronda Palazzari

Layout by Lisa Day

Our products will ship out to stores on March 1st, so you should be able to find them in your local stores or online soon! Thank you for stopping by.

Read more...