Showing posts with label tutorial. Show all posts

Mini Butterfly Valentine's

>> Wednesday, February 8, 2012

Hey everyone, Cindy here with you today to share a how-to make cute little butterflies that dress up mini lollipops for your child's classmates. Several months ago, my little girl & I spent some time on Pinterest (I know, I can't get enough of that place) & we found these cute Butterfly Valentine project. Later that day, she created a few of her own. So of course, I got to thinking about her Valentine treats & decided to make a smaller version.


Punch a large 3/16" hole at bottom of die-cut hearts.


Match holes together while creating a butterfly form & adhere together.


Once dry, carefully slip mini lollipop through dual hearts.


Use tiny glue dots to adhere stick to butterfly, pressing firmly.

Use glue dots to adhere banner names in front & adorn with small googly eyes.


Here I punched out smaller hearts with a "Love Corinne" note on the back of them.


Pretty simple! You could even dress them up with twine or gems for fun or even buttons. But since these will be going to a bunch of 4 & 5 year olds, I though it would be best to keep it simple for their little hands. The best part is that I started these super early instead of waiting until the night before.

Smooches!

Read more...

Day 9 - Teacher's Holiday GIft

>> Friday, December 9, 2011

I always to love to spoil my kid's teachers this time of year with some sweet treats and a gift card to their favorite place, but being a scrapbooker, I can't just give a plain old gift card! So I've come up with an easy gift card holder that you can attach to a mug, a plant, a plate of cookies, or whatever you might want to give your favorite teacher!

Gift Card Holders by Lisa Dickinson
Lily Bee Supplies:
     Jingle Patterned Papers: Peppermint, Garland, Tinsel, Mistletoe
     Jingle Stickers


Here's a step-by-step to create these card holders:

1. Cut a strip of patterned paper 2.75" x 6.25".  Score at the 4" line and fold.

2.  Cut another piece of paper to 2.75" x 4" and adhere it behind the flap you just folded. (Technically, this step isn't necessary if you're using 2-sided patterned paper, but I like to add the extra layer of paper to give the holder a bit more weight.)

3.  Stitch around all four sides of the card which will create a pocket from the folded flap.

4.  Round the top corners of your card holder.  Then use a die-cut machine or punch to make snowflakes to adorn your card holders. Christmas trees, stars, or snowmen would also be cute!

5.  Layer your die-cut shape with a sticker on the non-pocket side of your card.  I adhered mine using foam adhesive to give it some dimension.

6.  Punch a hole in the top edge, add some twine, and slide your gift card into the pocket!

7.  Attach your tag to any assortment of small gifts - a coffee mug, a stack of notepads, or a bundle of new pens.  And wish your teacher a very happy holiday!

BUT HERE'S THE BEST PART!  To make your holidays a little happier, too, we're giving away a Jingle Collection set to one lucky reader!  Just leave a comment on this post before Monday, December 12, at 12 noon (PST.)  We'll drawn one name as a winner and post their name on the blog that day.

Happy Scrapping (and holidays, too!)


Read more...

Day 8: A Do-It-Yourself Christmas Tree

>> Thursday, December 8, 2011

I am constantly inspired by all that I see on Pinterest, and when I saw this Christmas tree made from recycled wood, I knew I could put my own spin on it using the gorgeous Jingle collection.

Here is what I made.


When I showed the project to my husband, he thought the cedar shims he had in the basement would be perfect. Sure enough, 5 minutes later he had snapped the pieces into the shape of a tree.

First I sprayed each piece of wood with Glimmer Mist, in essence "staining" each piece. As it dried I cut strips of paper to fit each piece and inked the edges with chalk ink. Then using Glitter Mod Podge (AKA my newest obsession), I attached each piece to the wood. Finally I used Elmer's Wood Glue to attach the pieces to one center wooden piece.

Here is a view from the back. I am going to hang it using one of those 3-M strips. It's super light!


Here are a few close-ups:

See how shimmery the Mod Podge is? I covered this chipboard piece with patterned paper.


I liked the rough edges of the wood, so I tore the end of the paper to match the feel of the rough wood.


And again, the final product.


Products Used:

Jingle Mistletoe
Jingle Merry & Bright
Jingle Peppermint
Jingle Tinsel
Jingle Frost
Jingle ABC Stickers

Read more...

Starry, Starry Night

>> Friday, October 7, 2011

Quilts speak "autumn" to me. I love the look of a comfy, bright, patchwork quilt. I wanted to bring that style into a small area I'm decorating for fall in my bedroom, and I pulled out the new "Harvest Splendor" line from Lily Bee to make some quilted stars. 

Start off by drawing a basic star shape. It does NOT have to be perfect, as a matter of fact, it's even better if it's  not. 

I drew two, one slightly taller and one slightly wider. 

Then cut them apart, but keep them lined up right in order to keep yourself from getting confused. I drew numbers on all the pieces of each star so that I knew which pieces went to which one just in case they got mixed up. 
 Then trace each piece on to various pieces of patterned paper. This is the most time consuming part; settle in with a good tv show on in the background and you're good to go!

 As I did the pieces to each star, I laid them out together on the table to make sure I was keeping everything in order and that I liked the order of patterns & colors. This would also be great to do with the 6x6 pads (but I really liked how the larger patterns looked on these).


Ink all the edges with black ink and an ink dauber. Be careful to not leave it sitting out while you hop up for a minute, because someone might think it's "makeup." Ahem. 

Adhere all the inked pieces down to a piece of kraft cardstock. I left a small amount of space in between each piece. 

Cut the stars out. I alternated between pinking shears and regular scissors. Then punch a hole at the top of each star, and string twine through them. 

Hang from a strip of burlap with tiny clothespins, and enjoy! 


Lily Bee supplies:

Patterned Paper:
Peach Crisp-Harvest Market
Black Licorice-Harvest Market
Turtleneck-Harvest Market
Hayride- Harvest Market
Pumpkin Seeds- Harvest Market
Squash- Harvest Market


Other:
cardstock, scissors, twine, burlap, black ink

Read more...

Out of the Album

>> Wednesday, July 27, 2011

We all love photos and scrapbooking but sometimes I just want to get my photos out of the album where I can see them every day. Creating paper crafted frames just seems like a natural extension of scrapbooking and I love making them for friends and family. This particular frame is for my daughter who is heading of to university this fall. The beautiful Lily Bee papers work perfectly with the colours she's chosen for her new room. I also love how beautiful but subtle the papers are. They are designed to enhance your photos and not take away from them.


Today I'll walk you through this quick project and remind you how quick and fun covered wood and chipboard with patterned paper is.


First of all I started with a wood frame I picked up at a local craft store. This one is 8x8" square. I've adhered the patterned paper to the frame with a strong liquid ahesive and then trimmed away the excess. Sandpaper or a sanding file rubber over each edge makes for a nice smooth finish.


Patterned paper is a great way to make your own chipboard embellishments as well. You just need the paper, a die and a piece of chipboard. To get perfect edges and save time, die cut in one step by adhering the patterned paper to the chipboard first before cutting.


Here's the flourishes die cut. They look so much prettier than plain chipboard ones.


To add a little extra personalization to my chipboard bird, I've used the Picket Fence stamp set to stamp on some floral accents and words.


And here's the finished detail.

Lily Bee Supplies:

Happy creating!

Read more...

Simple Foundation Card

>> Thursday, July 7, 2011


Stationary: Mushroom
Stationary: Slushie
This & That: Milk Bottle
This & That Mixed Cardstock Sticker
This & That Alphabets
3-D Adhesive (like Helmar's Zap dots)
Ribbon
Brads

I am really into card making these days.  I love when i make a card that i know i can just repeat the elements and make multiple cards.  The above card is actually for a family friend who is currently enduring the riggers of boot camp.  We want him to know how proud we are of him and give him the encouragement & support all our armed forces need.  There is a great site that collects cards called Operations Write Home in case you are interested in making cards for donations.


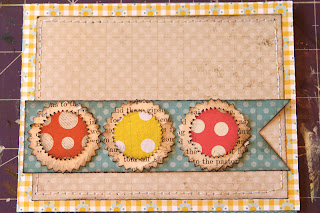
I am going to do a quick tutorial on how to put this card together.  Here are my supplies:
Stationary: Oatmeal cut to 3.75 x 5 inches
Domestic Bliss: Kitchen Confidential  4.25 x 11 inches
Stationary: Slushie 1.5 x 5.5 inches
3 punches shapes (using Found & Lost: Villa, Domestic Bliss Pearls & Heels, Hello Sunshine: Posies)
3 larger punches
buttons
letter stickers

Score & fold the domestic bliss paper in half to make the base of your card.  Next take your oatmeal paper, ink the edges, adhere it to the background paper, and stitch around the edge.
Take a pair the scissors and cut a triangle at the bottom side of the 1.5 x 5.5 inch stripe.  This will make your ribbon piece.  You can also use a wide ribbon trim like i did with the first card.

add your punched embellishments.  I inked all the edges and layered them on top of each other.  On the top card i put the punched pieces on 3-D adhesive and placed a brad in the center.
Add buttons to complete the embellishments.  You can use flowers, butterflies, hearts, brackets, etc.  Change it up with the seasons using christmas trees, hearts, snowflakes, pumpkins, etc.

Use stickers to add your sentiment.  You can see i turned this card sideways and created a whole new look. 

Lots of Love

Read more...