Showing posts with label Banner. Show all posts

Banner borders...

>> Thursday, May 24, 2012

Hi there, this is Danielle Flanders here with an idea for those banner stickers!

I loved the patterns in the cute Buttercup banner stickers, so I wanted to add them to a card. Small shapes are a great way to add many different patterns, colors and interest, and the triangles make it so easy because they are already cut out for you! I was inspired by how they came on the sticker sheet and transferred them right to the card just how they were on the sticker sheet.

A Victoria Park floral stamp was stamped in aqua ink on the top and bottom to frame out the sentiment and add some softness.
 Here is one more where I used the banner stickers horizontally to create a border.

I used the Buttercup stickers on these two cards also. A frame is cut in half and added it to the top and bottom of the "today is a good day" sticker.
This is a super quick and easy embellishment idea for a card/ layout. Thank you for visiting the blog today. Have a creative day!

Danielle

LilyBee Supplies:
Buttercup 12x12 paper - Flower Pot BCP 210
Buttercup Mixed Card Stickers BCS 215
Victoria Park Clear Stamps VCP 235
Other: ribbon, sentiments, ink: Papertrey Ink, twine: Pink Paislee.

Read more...

Blog Hop Day 3 with Epiphany Crafts and Glue Arts

>> Wednesday, May 16, 2012

Happy Wednesday and Welcome to Day 3 of our blog hop. Today's post features our Sketch for May's Sketch Challenge by Ursula Schneider. Let's take a look at her layout she created with the sketch.


I love that she has mixed our older paper from This & That along with Double Dutch and Buttercup. Our papers are so easy to mix and match from line to line.


Here is Maisa's take on the sketch:


I adore how she has cut the doily shapes from our Double Dutch Croquet Paper and embellished them with the Epiphany Crafts Circle Accessory. Maisa also used the Glue Arts 3D Foam Pac to give dimension to our Bag of Bits Banner.


Now we'd love to see YOUR take on this sketch! (And we'll pick one of your pages to win a lovely collection of Lily Bee goodies!) Here's the rules to keep in mind:

*Your layout must use at least two Lily Bee products.
*Post your layout to any gallery or your blog and link the post in the comment section of this post. OR post your layout on our Facebook page. (But not both, please.)
*Be sure and title your post "Lily Bee Sketch Challenge #9" so we can find it easily.
*The deadline for entries is Thursday, May 31st at 9:00 pm PST.
*And of course, be creative and have fun!

Read more...

Combining stamps with patterned papers...

>> Thursday, April 19, 2012

Hello! This is Danielle here with my very first post for Lily Bee! I'm honored to be here and hope to inspire you to try something new and exciting in your paper crafting.

When I first starting working withing with the new Lily Bee lines, I was so amazed at how well the lines mixed together! I love to stamp also, so I pulled out the Victoria Park stamp set and got to work stamping the frame with black ink on different patterns of the 6x6 paper pads.

First, I made this card:
I stamped the frame onto a gray polka dot paper from the Buttercup line and cut it out, then stamped the little florals on either side of the frame. I immediately grabbed this teal floral sticker, because I loved the colors on it, and paired it with some of the banner shapes! The black banner really helps the smaller patterns stand out and grounds the design. It gives the design some "weight".

After this card was finished, I wanted to make a coordinating card focusing more on the stamped frames, so I stamped like crazy on different patterned papers and began rearranging them on white cardstock until I was pleased with the design.
Some of my favorite patterns are the checks and florals from Double Dutch and Buttercup.
I love girly floral patterns, yet I also love somewhat of a clean look to my work, so pairing these patterns with bright white cardstock makes them really stand out and allows the patterns to be the focal point of the card! Don't be afraid to try stamping onto patterned paper rather than cardstock. I hope you enjoyed these ideas for card making today!

Danielle

Lily Bee Supplies:
Buttercup and Double Dutch 6x6 Paper Pads
Victoria Park Bag of Bits
Victoria Park Clear Stamps
Victoria Park Mixed Cardstock Stickers
Handmade Bag of Bits 
Other: twine, red and black stamping ink.

Read more...

Day 7 - Vintage Christmas Banner

>> Wednesday, December 7, 2011


It's beginning to look a lot like Christmas! Have you been following all the wonderful festive projects each day here on the Lily Bee Blog? It's Julia here, with another fun and holiday project to inspire you.


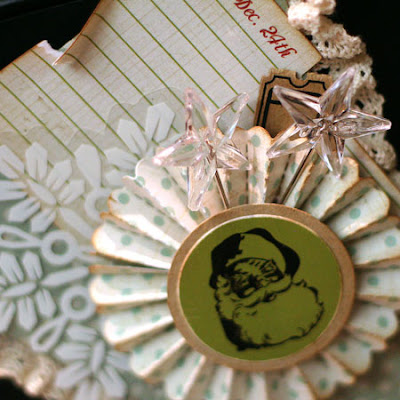
I love creating banners to decorate my home and the beautiful soft and subtly distressed papers of the Jingle line inspired this vintage style holiday banner. I've strung it across a black painted dresser that I use as a sideboard for a festive look this holiday season.


I started out by creating each triangle pennant from some chipboard. Each triangle measures 4.5" across by 6" deep which is a great size for flexibility. I've used the 12x12 papers but this project will also work using the smaller scaled Tiny Tablets.

After covering each chipboard piece with patterned paper, I stitched around the edges for a little extra detail. Around the bottom edges I've adhered some ruffled lace to add to the vintage look.


To create some fun embellishments for each pennant, I've combined Jingle Index Cards and created sweet little rosettes using patterned paper and the Jingle stickers. If you're looking for greater detail, most of these photos can be clicked on to enlarge them.


After each pennant is created, punch a hole on the top corners of each triangle with a hole punch.


String each pennant together using some ribbon or hem tape.


Decorate your home with your finished banner and enjoy!

Thanks for joining me today and I hope you find joy preparing for the holiday season,


Lily Bee supplies:
Patterned Papers: Jingle - Mistletoe, Garland, Tinsel, Frost
Index Journaling Cards: Jingle
Cardstock Stickers: Jingle
ABC Stickers: Jingle

Read more...

Scraplifting your layouts to make cards

>> Monday, September 19, 2011

I know that it is common practice to use scraps left over from layouts to make cards, but if you are anything like me, deciding on a card design can be hard work!

I decided to have a go at making a layout, and then lifting that layout, papers and design to make a card.  This is what I came up with ...

My layout


And this is the card that I made by lifting the layout design and colour scheme.


I hope that if you find card making a little difficult (like me!) that you find inspiration to try this after making your next layout.

Lily Bee supplies:
Picket Fence Patterned Papers: Porch Swing, Cottage Garden and Seize the Day
Picket Fence Mixed Cardstock Stickers
Picket Fence ABC Stickers

Cheers


Read more...

Special Moments

>> Wednesday, August 24, 2011

One of my favorite parts of scrapbooking is reliving those special moments.  Taking a photo & playing around with paper, remembering all the details and all the fun you had in that moment. 


Lily Bee Products
Memorandum Whiteboard
Head Over Heels Dreamy
Head Over Heels Flirt
Happily Lost Hammock
Hello Sunshine Posies
three Little Birds Rub-ons

I can still hear the laughter at this table.  We sat down to do a little make & take only to see our friends sitting across from us.  It was such a fun time that included creative play.  On the layout i wanted to capture a bit of that same fun atmosphere.  I used three different mists in the background and then layered a tag i made from one of the new papers.  Three simple blue strips grounded with chocolate stitches ground the large photo.  I added in splashes of pink to complement the photo.  the rectangular journaling really brought this page together.

Lily Bee Products
Stationary butter
Memorandum Boardroom
Memorandum 9 to 5
Memorandum Mixed Cardstock Stickers
Lovely Chipboard Stickers
This & That ABC Stickers
Brown Tulle Flowers

This beautiful door was lost on me.  I had been by it so many times and didn't stop to take in because i was on the way to somewhere.  Then one night, while waiting on my husband Andy to do some shopping, i turn around.  It was breath-taking and then i really started to see things with new eyes.  i had taken the scenery for granted.  This layout reminds me to stop and be grateful, to take it all in and see Paradise. 


Read more...

Shadow Box

>> Thursday, July 21, 2011

Hello Lily Bee fans from a very rainy and cold Sydney...Katja here today showing you a project I had lots of fun doing. I've decorated a Shadow Box for my daughters room with her favorite colors blue, yellow and pink.

First up I've painted all the compartments and outside of the box with crackle paint and after letting it dry (this can take a few hours) put some darker ink over it which will settle in the cracks and give it a bit of a rustic look. I've also painted the front frame with a coat of Glimmer Glaze (you can see bits peeking out from behind the ribbon).
Next all the sides of the compartments were covered with Lily Bee This & That 'Milk Bottle' paper.
The flower in the lower right corner was created by using a 12in strip of paper, cutting all along the strip in small intervals (make sure not to cut all the way through) and then rolling the strip around the end of a thin object (I used a brush but a quilling tool would be even better). Glue the ends together and start bending the little strips over to create your flower.
Here are some close ups of the project. I hope you enjoyed this!


Lily Bee Supplies:

This & That: 'Milk Bottle' paper
Happily Lost: 'Hammock' paper
Happily Lost: 'Sun Soaked' paper
Happily Lost: 'Good Book' paper
Happily Lost: Mixed Cardstock Stickers
Stationery: 'Oatmeal'cardstock


Read more...

Sweet Home Banner Tutorial

>> Tuesday, March 1, 2011

I am in love with the banner trend. I just can't get enough. With Spring on it's way I thought I'd hurry things along and add a fun touch of spring with a banner for my home. Keep reading and I'll show you how I created it.


You'll need some supplies to get started. I've used the new Picket Fence line from Lily Bee Design. It's perfect for Spring & Summer. You can create a banner by creating your own template but I love shortcuts and here I've used a Maya Road chipboard book. Just unclip the metal rings and spread it out and you are good to go. It's not the traditional triangular style banner but I think the unique look is pretty fun.


Lily Bee Supplies Used:

Picket Fence Pattern Paper - Veranda, Cottage Garden, Porch Swing, Fresh Air
Hello Sunshine Chipboard Stickers
Domestic Bliss Rub-ons


Covering the chipboard with the patterned paper will take the most time in this project. Use a liquid adhesive to adhere to the chipboard and then sand away the edges. You can use sandpaper but a small metal file will work great for sanding the tiny notches and details.


Next, stitch the chipboard if you have a sewing machine. Yes. You CAN stitch chipboard and it looks great.


Decide on the word you're going to spell on your banner. I've chosen home and have cut it out with my Silhouette Digital Craft Cutter from Kraft cardstock. If you don't own one, trace some letters or use some purchased chipboard letters. The rub-ons from the Lily Bee Domestic Bliss line work perfectly with my theme.


To add detail to one of the pennants I've covered a little chipboard house in more Picket Fence patterned paper.


It's easy to create your own die cut flowers to coordinate with the project. I love mixing two prints together.


Crumple the petals up in your hand for dimension, arrange them and staple together.


Finish off with some fabric leaves, a button and a Lily Bee chipboard piece.


Add other embellishments throughout your project until you feel that it is finished.


Binding tape or ribbon works great for stringing your banner together. A needle makes it super easy to thread through the holes.

Here's a closeup...


And one more...


Feel free to click on the photos to enlarge them for better detail.


Take some time and paper craft for your home. You'll love being able to see your creative projects as you go about your daily life.

Happy creating!

Read more...