
Bakers Twine Tutorial
>> Wednesday, April 13, 2011
I love using Bakers Twine on layouts- it adds such a rich texture to the page, like in this layout using Picket Fence. 
Lily Bee Supplies Used:
Picket Fence Pattern Paper- Porch Swing, Cottage Garden, Al Fresco, Veranda, Fresh Air
Three Little Birds Accent Rub Ons
Lately, my favorite "technique" is to create a whimsical, "loopy", shape with Bakers Twine. When I don't have time to add stitching to my layouts, this is my "go-to" technique. It adds a very natural and organic feel to the layout!

First, the supplies. You will need Bakers Twine on a spool (the smaller the spool, the better-- I really like Martha Stewart's Bakers Twine.), and an adhesive runner (I prefer Helmar's Quick-fix Adhesive Runner).

I like using twine on a spool because it naturally has more "curl" to it.

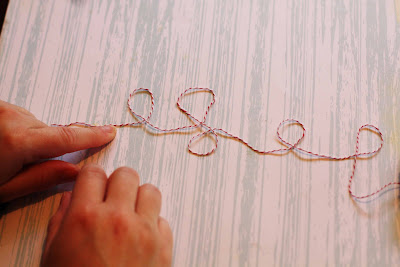
You will take the twine and start to unroll it from the spool. There will be parts of the twine that naturally "loop" on it's own.

Continue to unroll twine across the page straight from the spool. At this point, don't worry if it's not positioned exactly how you want it.

Once you are done unraveling the twine, cut it from the spool. At this point, position the loops the way you would like it (i flipped the third loop in the opposite direction, and made some loops larger than others).
When the twine is in a position you like, it's time to adhere it to the page. To do this, start on one of the twine and adhere about 1/2 in of adhesive underneath a section of the twine. You can space the adhesive spots a few inches apart. When adhering the loops, you will need to adhere either sides of the loop for enough support. As you do this, you will start to get a feel for what parts of the twine need more adhesive than others.

After you are done adhereing the twine, it's time to go back and remove the "excess" adhesive that pops out from behind the twine. I am sure there are many fancy tools out there that will help you do this, but I simply roll my finger along the adhesive I want to remove and it rolls right up!
Finally, embellish on top of the twine, or leave it as is. It's a fun way to add a fun extra element to your pages!
 Thanks for stopping by the Lily Bee Blog today!!!


7 comments:
This is so cool!
Beautiful layout! Great tutorial too!
Clever! I was using wet glue. But this is way better. And faster. Thanks, J!
adorable!
So beautiful!!
That's so great, Jenni! I have wanted to know how you do this for a while. I too used glue. Bleh.
so happy to see you embracing baker's twine. cute cute layout.
Post a Comment