
Fabulous May Flaum Tutorial
>> Friday, May 21, 2010

What could be better than warming weather and happy memories? For me, that’s easy. Making time to scrapbook. My name is May Flaum, and I’ve been playing a whole lot as I get ready for my next on-line class at Big Picture to start in June. Lily Bee will be featured during my class, and I’m happy to be popping over here today to share a new layout of mine with you.
What I love about Lily Bee the most is that I can get a vintage feel, but still use my current photos and have bright colors and lots of fun. Today I’ve created a layout with two (4 x 6) photos to share with you.
Supplies: Lily Bee “hello sunshine” rub-ons, chipboard, die-cuts, and patterned paper; other: cardstock, two small doilies, pen, four buttons, thread

After I laid out the papers (6 ½ x 12 torn white cardstock, 5 x 12 torn patterned paper) and photos I set to work on my pleated faux-ribbon effect. I used two strips of ¾” x 12” patterned paper and just folded (as shown above). Pleating takes a little getting used to, but it gets to be really fast and easy – and such a fun effect for your patterned paper! 
To adhere the strips just use dry adhesive or tape runner (be generous!) and press the areas you want to be against the paper down. If desired you can make it flatter by stitching into place or simply pressing each bit down. Totally a personal choice!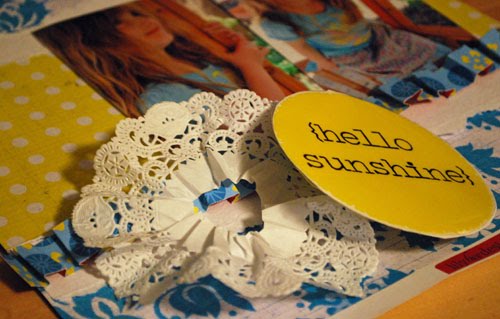

Another fun thing I did on this layout is to layer a rub-on with a doily. This time, my small doily was just a little too big so I cut out the center and wrinkled it to shrink it up. Then I used plenty of adhesive to stick it down to the layout before mounting the rub-on (which was rubbed onto white cardstock and backed with a generous helping of foam adhesive) on top. 
I repeated a similar technique with paper ribbon underneath one of the (awesome!) Lily Bee chipboard flowers. I topped it with a button and continued on! 

For the rest I added in more of my chipboard buttons (oh how I adore them!), some strips for journaling (about 5/8” high, edged with pink ink), and I cut the corner off one of the die-cut frames for my tab (top left).
I had so much fun with this spring page, I’m inspired to get more photos out and play some more!
If you’d like, please feel free to visit me at my BLOG, and come check out my class too if you’d like: Big Picture Scrapbooking


6 comments:
May, your lay-out is so adorable! 'Love the design and the colors, too. Thank you for sharing. I hope that you have a great weekend!
Very cute! Great techniques too.
Really good tips in this tutorial. Thanks
Anne
Very cool - have you seen the Martha Stewart die cut lace tags - I think they are so you.
Wow. this is an amazing page, TFL!
Very cool!!!
Post a Comment